In the Library Research Support team we have quite a bit of experience of 3D scanning and of photogrammetry, but have never tried combining digital photographs with scan data to make a ‘photorealistic’ 3D model.
When we were asked to scan a large, engraved shell belonging to the Brunel Institute , we decided it was time to give it a go, using our Artec Space Spider structured light scanner and the ‘phototexturing’ function in Artec Studio 16. This phototexturing option allows photographs of the object to be combined with the digital model to improve the model’s textures and produce a more photorealistic result.
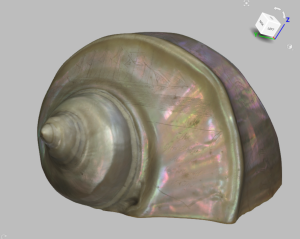
The shell in question has a shiny surface and is engraved with text and images, including depictions of the SS Great Britain and Omar Pasha, an Ottoman Field Marshall and governor. Shiny surfaces can be problematic when scanning, but we dialled up the sensitivity of the scanner a bit and encountered no difficulties. We were also concerned that the very low relief engravings would not be discernible in the final model, which did indeed prove to be the case.
We were careful to capture both scans and photographs under the same conditions, scanning one side of the shell and then, without moving it, taking photographs from every angle before turning it over to scan and photograph the underside.
When processing the scan data, the main difficulty was fixing a large hole in the mesh which occurred in the cavity of the shell where the scanner had not been able to capture data. Because of the complex geometry, Artec Studio’s hole-filling options simply covered the hole with a large blob. Therefore, we used the bridge function to link opposite edges of the large hole and subdivide it into smaller ones, which could be filled with a less blobby result. We then used the defeature brush and the smoothing tool to reduce flaws. The result is not an accurate representation of the inside of the shell, but gives a reasonable impression of it and, without any holes in the mesh, the model can be printed in 3D.
Adding texture from the photographs was simply a matter of importing them in two groups (photos of the top and photos of the underside) and matching them to the fusion. A handful of photographs couldn’t be matched but there was enough overlap between the other photographs to complete the texture. The phototextured model does show some shadows as we were not using dedicated lights, but there is significant improvement in the resolution and in the visibility of the engravings.

When we came to experiment with printing the model, we found there was not enough 3d geometry to reproduce the engravings, though we had avoided simplifying the mesh during processing. As the faint engravings on the shell are mostly visible through discolouration, we think that 3D printing in colour would be a good solution and the Brunel Institute are also considering other possibilities, such as engraving directly onto a 3D print. We look forward to seeing the result of their chosen solution.